Hello Exam Seekers,
There’s been a while since I post something about the CELTA Course. Last time, I finished working on the assignments. If you haven’t read them yet, make sure you do:
- Assignment 1 – Focus on the Learner;
- Assignment 2 – Language Related Task;
- Assignment 3 – Language Skills-Related Task;
- Assignment 4 – Lessons from the classroom.
Today I’m working on something much simpler: Handouts.
First things first, what are handouts? According to Cambridge Dictionary:

Why am I talking about handouts? Because there are many CELTees who don’t really know how to prepare a proper handout; and when it comes to delivering their lesson, they usually lose points for the handouts. So how should you prepare and how shouldn’t you prepare your handout?
Here is a sample of a handout I prepared for one of my CELTA lessons:

As you can see, it is clear and clean. Moreover, students will be able to know when they used this handout and from which lesson it was taken.
Here are some details to pay attention to so that you will be able to prepare handouts similar to mine:
1) Size of the paper:
This is actually one A4 sheet of paper divided into two. It seems small, right? Well, when you are planning a CELTA Lesson, your lessons should take no longer than 50 minutes, which means that you have to use your time to give your students a warm-up and/or a lead-in, present the grammar topic (if it is a grammar lesson), give them practice and production tasks. Therefore, there shouldn’t be many things in your handout.
As you can see above, I took this exercise from the book: Cutting Edge. I got these 2 exercises and adapted them to:
- Practice Task.
- Production Task.
My students didn’t need the warm-up, lead-in, and presentation in the handout, so I put only the tasks which they had to write something or they needed a guide to follow in a conversation. Therefore, I have half of an A4 sheet of paper with content for my students to use.
There are other lessons that require more than half of an A4 sheet of paper, however, if you are preparing a lesson like the one above, half paper is fine.
Some people use the whole A4 paper to have their tasks, but it’s not necessary. Especially if it leads to extra blank areas on the paper. You are wasting paper!!! Don’t do that! If your exercises seem to fit in half of an A4 sheet of paper, use half of the A4 sheet, or make it smaller so that it fits well. Unless, of course, you have students who have difficulty in reading and writing on small sheets of paper, then you should provide a bigger version for those students, other than that, this size of paper is more than enough!
2) Size and type of the letters:
Then we go to the font size of the letters. How small should I make my handout? I usually use regular font-size: 11-14 depending on the title or subtitle I use, take a look:

As you can see, I used Calibri, which is a good font to read in size 11pt. Students can read and there’s still plenty of space to write, meanwhile the description of the exercise is a bit bigger (13-14pt) to differentiate from the tasks themselves.
Now, let’s analyze part by part of the heading. To call people’s attention I made it a little different from everything else:
- Grammar Lesson: I think it is nice to let the students know what type of lesson they are having (listening lesson, reading lesson, etc). Moreover, it’s clear for you and for your tutor. I also put it in a different font type to call everyone’s attention and make it “different”.
- (2nd conditional): This was a Grammar Lesson, but what was the subject? Again, I make sure to put this on my handout, so that the students know what they are studying. Sometimes students do not know, or they forget along the way. Also, when they look for this handout in the future, they will be able to identify it quickly.
- Adapted from Cutting Edge: Important aspect of the lesson! You must always write where you took the exercise from. If you did it yourself, or if you took it from your creativeness, then write your name.
- 26/01/2015: I also find it interesting that the students have the date on their pieces of paper. If you don’t put it there, it is most likely that they won’t put it either. It’s a way to make them organized – your handouts and the students.
Here is another sample of a handout:
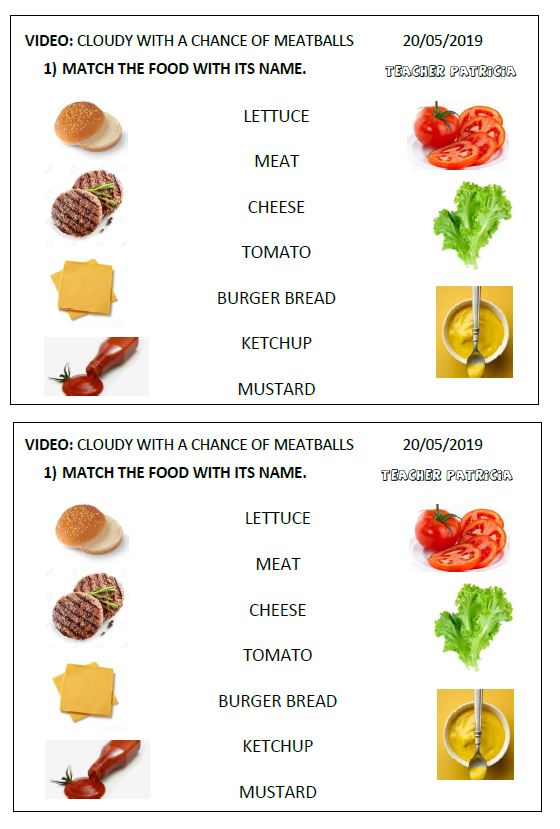
Again you can see that I put 2 handouts in one A4 sheet. This was a kids’ lesson based on a video, different from the one above which was a grammar lesson for adults.
Even though they are completely different lessons and tasks, you can find the same aspects:
- I specified it’s a video lesson with the name of the video watched;
- I put my name signing the activity;
- I put the date;
- And different font type – since it was a class for young learners, I wrote all in capital letters.
3) Reference:
Where did you take your material from? Did you do it by yourself or did you take and adapt it from a coursebook? Did you take the pictures from the internet or did somebody make them for you?
An important aspect of your handouts is telling where the material used (pictures, and content) was taken from. As I did in the previous handouts when I put “adapted from Cutting Edge” or I wrote my name in the activity.
For the pictures above (the food vocabulary), I didn’t feel the need to write where I took each of the pictures from – they were all taken from Google Images; however, if you are using a bigger image, I advise you to write where you took it from in a way that you provide the reference, but it is not so big to be highlighted, as you can see below:

The suggestions I described above are great prices of advice that I used for my own handouts. If you follow these steps you won’t have problems when preparing your handouts.
Was it all clear? I hope it helps you all prepare better handouts and earn some points in your CELTA Course. But keep this in mind: this model is not only good for your CELTA lessons but for all of your lessons. This is for life!
Well, I hope that this content was useful for you, but if you have more questions, comment below!
————x————
That’s it for today! Please like the post and follow the blog on:
- youtube.com/c/ExamSeekers
- facebook.com/ExamSeekers
- instagram.com/ExamSeekers
- twitter.com/ExamSeekers
You can also listen to this post at Anchor!!!
Have a great week,
Patricia Moura
Make a one-time donation
Make a monthly donation
Make a yearly donation
Choose an amount
Or enter a custom amount
Thanks for making this possible! 🙂
Thanks for making this possible! 🙂
Thanks for making this possible! 🙂